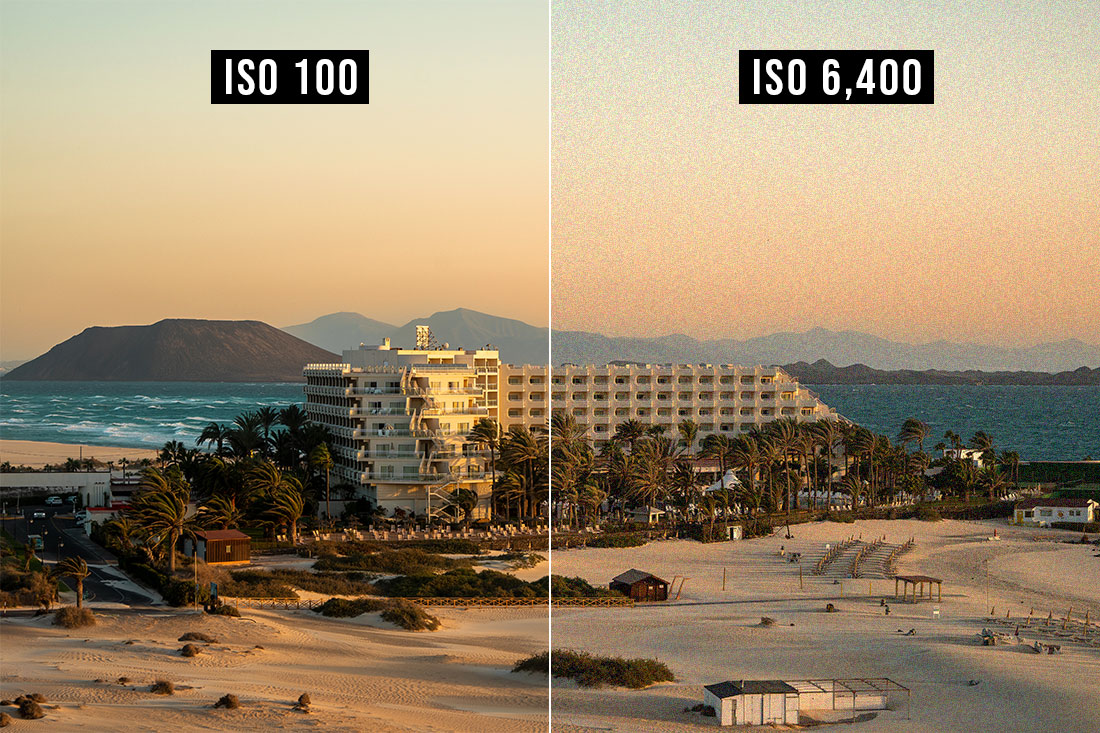
If you’re a photography beginner the term ISO probably seems a bit too technical.
By the end of this guide, you will know everything you need to know about ISO, and how to apply it in different photography scenarios.
Why is ISO important?
- If you raise the ISO value, your images will look brighter.
- If you lower the ISO value, they will look darker.
That’s the whole magic!
Now obviously it’s not as simple as that, but it’s also not complicated. As with shutter speed and aperture, changing any camera setting will also result in (usually) negative consequences.
So what’s the negative part about raising or lowering your ISO?
Noise on your images.
The higher your ISO value is, the more visible the noise. More often than not, this makes images look uglier, with colors and contrast washed out.
You’re probably wondering; why even shoot with high ISO if it’s so bad?
The Ultimate Photography Guide to ISO & Noise
What is ISO?
ISO is labeled as a number value and looks like this:
- ISO 100
- ISO 200
- ISO 400
- ISO 800
- ISO 1,600 and so on.
The higher the number, the more sensitive to light your camera is. You can see that they keep on doubling (it goes beyond this list).
This means that ISO 200 is twice as sensitive to light as ISO 100, ISO 800 is four times as sensitive as 200, and so on. The difference between each next value is called 1 stop (this “stop” term can also apply to shutter speed and aperture changes).
When to Use Low ISO?
A low ISO value is anything between 100 and 1,600.
- Daylight: Sunny days are perfect because there is a ton of light available.
- On a Tripod: If your subject isn’t moving (like landscape, or products) you can select the lowest ISO.
- Maximum Quality: Low ISO results in lowest amount of noise possible. Choose this for the best image quality.
 ISO 100
This photograph was taken at ISO 100 on a sunny day. Because there was so much light, my shutter speed was 1/500 (very fast) which is more than enough to get a clean sharp shot (it helps that the car was stationary).
If it was very dark, or the car was moving quickly, my ISO would have to go up.
When to Use High ISO?
A high ISO is anything over 1,600.
- Indoor Events: Concerts, parties, birthdays, all low light situations. Places where flash isn’t allowed.
- Sports/Action: Both outdoors and indoors, because you need really fast shutter speeds to freeze the motion. Instead of opening the aperture to the max, you should raise your ISO instead.
- Wildlife: Similar to sports, animals can be super quick. With high ISO values, you will be able to freeze their movement.
- Night: The most common scenario for high ISO is shooting outside at night (cities, portraits, etc.).
Basically, the darker it is, the higher your ISO should be. This is especially true if you are photographing a moving subject (kids running, singer performing, cars moving) because you will need that extra light to freeze motion.
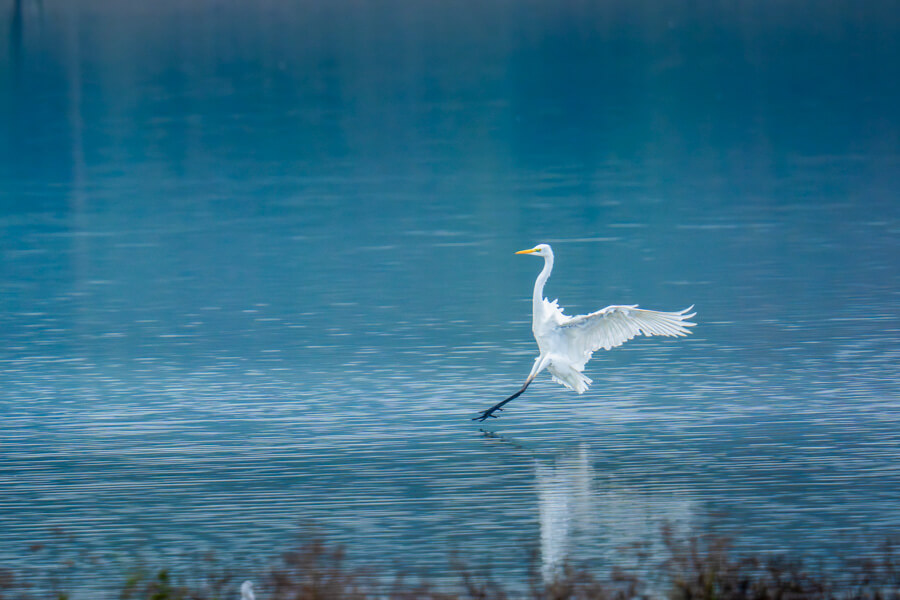
ISO 2,000
This photograph was taken at ISO 2,000 and a shutter speed of 1/1600, on a cloudy winter day.
In order to freeze the moving bird, I first set my shutter speed to something fast; anything over 1/1000. Only then when I saw the bird wasn’t blurry did I start raising the ISO to get a normally exposed photograph.
If the bird still wouldn’t appear sharp/frozen, I’d have to raise both shutter speed and ISO again until my exposure and main subject would look good.
Is Noise Really Bad?

The more your raise your ISO, the more noise will be visible.
This varies greatly between different cameras and has a lot to do with their sensor and pixel size (bigger is better). Take a look at my Full-Frame vs APS-C guide here to see just how much difference in noise there is.
Basically, cameras with bigger sensors show much less noise when using high ISO. A full-frame camera that costs $2,000 will greatly outperform the best smartphone, even if they both use the same amount of megapixels (a common misconception about quality).
However, here’s a useful tip I heard a long time ago:
If the moment is more important than image quality, you shouldn't worry about noise.
It couldn’t be more true (especially in this age with Lightroom and other programs). It’s better to capture the moment in bad quality, than not having it at all.
Plus, having some noise on your shots isn’t even as bad as we often like to think (cool explanations here and here). If you don’t print your images large and mainly share them online, chances are most people won’t even notice any “flaws”.
Noise can add a little bit of texture and give the image a more realistic look. A lot of people actually add some noise/grain back to their images because it reminds us of film days; it’s like it breathes some life back into it.
Which ISO to Use?
 ISO 200
This is just general advice and depends on your situation.
- ISO 100: Delivers best possible image quality but is only good with plenty of light. This could either be inside in a studio with flash lights, or on a sunny day.
- ISO 400: Still perfectly fine in terms of image quality, this will probably be your most commonly used ISO. Mostly for outside use, also when the day is cloudy/overcast.
- ISO 800: Your starting point for indoor photography or shooting early/late in the day. Mirrorless cameras and DSLRs made in the past few years can still output great looking quality.
- ISO 1,600+: Use this for action, sports, wildlife, whenever you want to freeze motion. Also necessary in low light (concerts, parties) and indoors.
Many cameras can go way higher, often up to ISO 102,400, but personally I don’t think I have ever shot above 12,800. Only the latest full-frame cameras can handle such high values and still deliver something usable, and it’s so rare that you would need this anyways.
There are also ISO values in between (ISO 320, 500, 1000, etc.) but the ones I mention in this guide are full stops; always double the previous one.
6 Most Important ISO Tips

1. Use ISO as Your Last Resort
You should only change your ISO after you have selected the best shutter speed and aperture for your scenario. These 2 settings affect your image much more than ISO, which only makes it brighter or darker (plus noise, but that can be removed).
With the shutter speed, your subject can appear blurry or sharp. With aperture, you control how much you want in focus. Only then, if your image is too dark/bright, should you mess with the ISO to get that proper exposure.
2. Turn Noise Reduction Off
Most cameras have Noise Reduction enabled when you first buy them, so make sure to turn it off completely. Personally I use Lightroom for noise removal but even free programs out there can do a better job than what’s built-in the camera.
- You want the original image to be as untouched as possible before transferring it to your computer. If you shoot in JPEG instead of RAW however, noise reduction will be applied regardless.
3. Select Auto ISO (Minimum and Maximum)
I often shoot in Auto ISO, but manually select what’s the minimum and maximum I want my camera to choose.
I use Auto ISO for action and traveling, basically whenever I don’t want to miss the moment and only focus on shutter speed and aperture. If I’m in a studio or a controlled environment then I always select my ISO manually because it most likely won’t have to change.
Auto ISO is perfect because it doesn’t care about noise, its only job is to help you get the perfect exposure.
4. Lightroom Denoise is a Game Changer
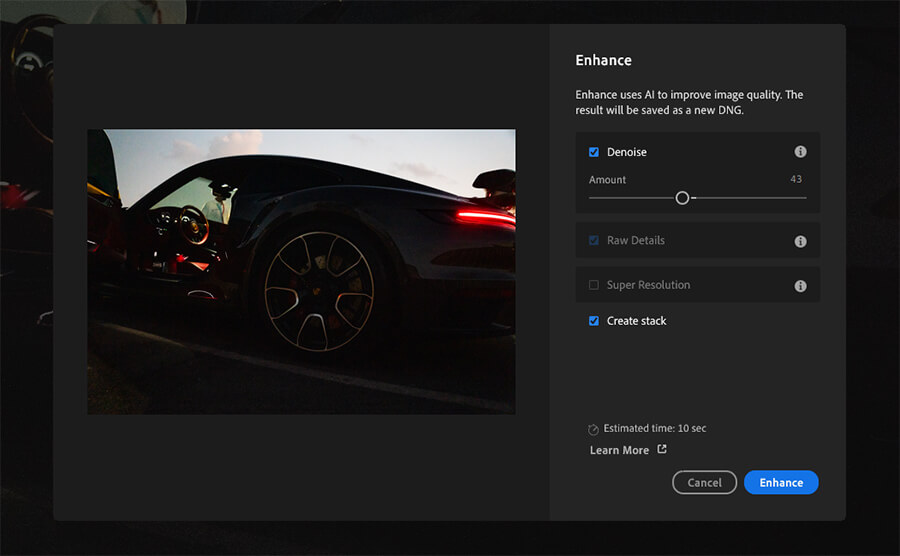
For a long time, noise reduction in most programs would greatly reduce your sharpness.
You either had to choose between a photograph with no noise that looked like a watercolor painting, or the original noisy sharp one.
Only recently did Lightroom introduce its Denoise feature that uses AI. You can control how much reduction you want applied and it works wonderfully.
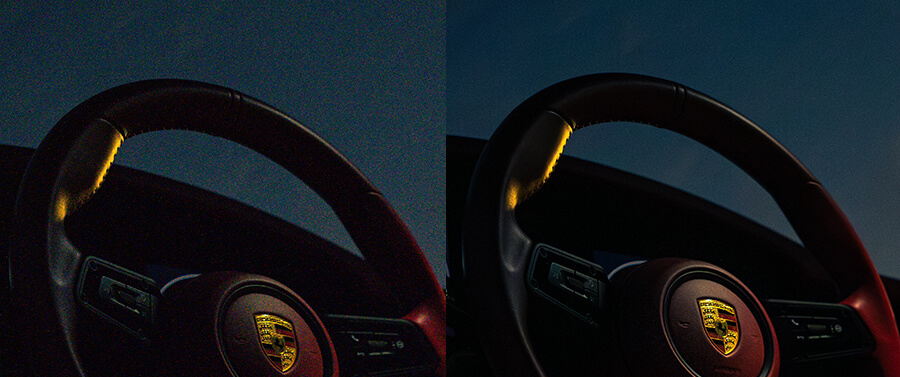
I took the original image (left) with ISO 2,000 and used Lightroom’s Denoise to get this noise-free one in 10 seconds.
The results are mind blowing.
Some shots I took with ISO 3,200 look like ISO 100, while still retaining plenty of sharpness and quality. The only downside is that you need a powerful enough computer (graphics card to be specific) or it can take a couple of minutes per shot, which is really annoying if you have to go over hundreds of them.
5. Shooting Action? Use High ISO
If freezing action is the most important part then I always raise the ISO, even on sunny days.
A fast shutter speed (over 1/1000) is sometimes so quick that your “normal sunny day” images can actually look too dark with low ISO.
To combat this, simply choose the highest ISO possible to get your exposure correct. This is especially true for concerts, weddings and events where it’s all about capturing special moments.
6. For Maximum Image Quality, Use Low ISO
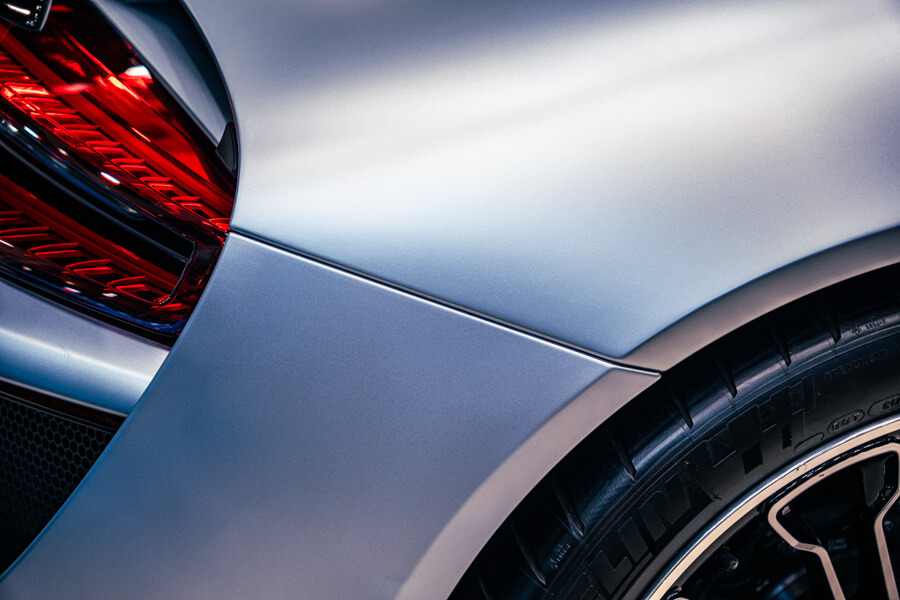
For static subjects in controlled light (eg. product photography in a studio), we usually use tripods for better framing.
Since your subject is static AND you have a tripod, your shutter speed doesn’t matter as you have no motion to “stop”. Therefore you should select the lowest ISO (below 250), even if your shutter speed is really long.
If you ever shoot products with your smartphone (and a tripod), try switching to manual mode and selecting the lowest ISO because phones degrade quality much quicker.
ISO + Shutter Speed + Aperture
The 3 most important settings in photography.
- Shutter Speed: Controls for how long the sensor is exposed to light; also freezes or shows motion, depends on the speed
- Aperture: Controls how much light reaches the sensor; also makes certain elements in focus or out of focus, depends on the size
- ISO: Makes the images darker/brighter, introduces noise with high values
Every single photograph ever taken was simply a combination of these 3 settings, even in film days.
All 3 directly affect the light hitting your sensor, so it’s important to understand how close together they actually work. You can’t change one and ignore the other 2 (unless you are in semi-manual modes).
If you raise the shutter speed, well, you’ll probably have the raise the ISO or make the aperture bigger. Sometimes both! Affecting one will often resulting in slightly tweaking the other 2 to get back to a properly balanced exposure.
Learn about the “stops” (1 stop, 2 stops, etc.)
This part might seem a bit weird, but it’s super helpful and easy to understand.
Simply put, instead of saying you went from 1/500 to 1/1000, it’s better to say you raised the shutter speed by 1 stop (doubled it).
Why?
Because you will now have to change either the aperture, or ISO, or both to get the same exposure, but by how much?
Exactly 1 stop.
You will either raise the ISO by 1 stop, or make the aperture bigger by 1 stop. If it was 5 stops, then that’s 5 stops you also have to add/take from the other two.
It helps to memorize the full values of all 3. Shutter speed and ISO are easy because it’s just doubling the numbers, but aperture is a little bit harder to remember (from f/4 to f/5.6 is 1 stop, not really “logical” right?).
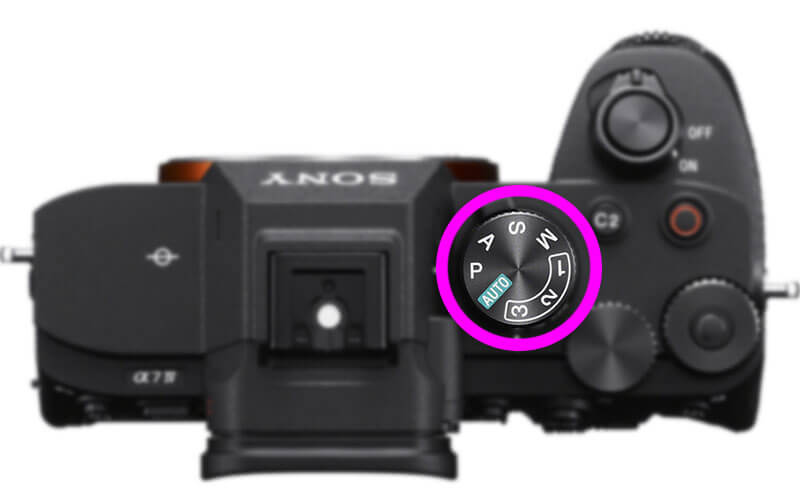
How to Control ISO?
With mirrorless cameras you have a couple of buttons assigned to controlling the shutter speed, aperture, ISO and much more. All of these can be accessed by switching to Manual or Semi-Manual modes.
Read your camera’s manual or watch a YouTube introduction guide to understand how much customization your camera allows you.
Even though changing the ISO is “amplifying how much light your sensor sees”, there’s no way you can damage anything so just experiment with different values and see when your own camera starts to struggle.
That’s it!
The best way to learn is to simply shoot a static subject and mess with all 3 settings. We have Live View (what you see is what you get) on today’s cameras and phones so this knowledge is way easier to grasp.

